
The NotebookLM Data Table
Turn Document Chaos into Instant Clarity

One of the biggest advantages of NotebookLM is something most people walk right past: the ability to pull together data from dozens of different sources — different formats, different dates, different authors — and organize it all into a single, clean data table.
Here’s what that looks like in practice.
The Volunteer Coordinator Problem
Say you’re managing 300 volunteers. You’ve got intake forms that you’ve been gathering in folders for years, emails from volunteers about their availability, old spreadsheets someone built and abandoned, notes from training sessions, PDFs of certifications — all of it scattered across your inbox, your desktop, and shared drives and file folders. (If the data is on paper, scan it and save it as a PDF and upload it to NotebookLM,)
Nobody has time to read all of that and build a clean picture of where things stand. That’s exactly what NotebookLM is for.
Go to https://notebooklm.google.com and create a notebook, then upload everything. Don’t sort it. Don’t curate it. Don’t decide what’s relevant — that’s NotebookLM’s job. And as your year progresses, keep adding to it. The more you put in, the more useful it becomes.
The Prompt Is Everything
Once your sources are uploaded, after you open your relevant notebook, go to the Studio panel on the right side and select Data Tables. This is where most people go wrong — they type something like “make a table” and get something generic.
The secret is in the column headings. Whatever columns you name in your prompt are the columns you get. Be specific:
“Review all uploaded volunteer records, training logs, and role requirement sheets. Create a data table with columns for: volunteer name, assigned function, required training for that function, completion status (Complete / Incomplete / Expiring soon), expiration date if applicable, and a specific action needed. Flag anyone who should not be assigned to shifts until requirements are met.”
Not getting what you need? Rewrite the column names and run a new prompt. The table updates immediately. Adding more data, simply click the Add Source button in NotebookLM and upload the new data and then rerun the prompt.
Here’s a sample of what comes back — imagine this with 300 or 1000 volunteers’ (or employees’) worth of data behind it:
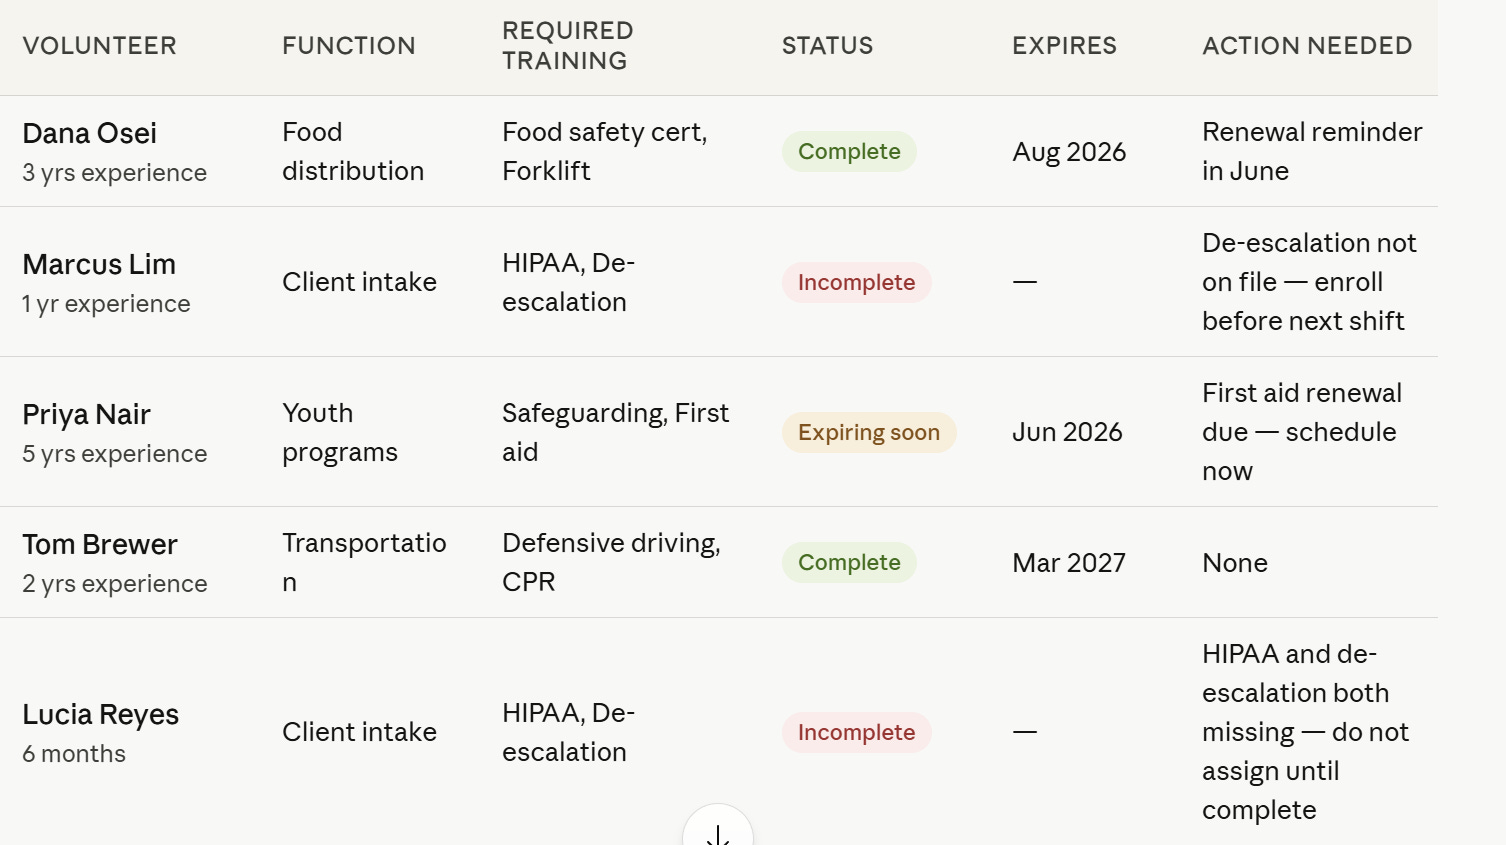
One more thing: when the table looks right, export it to Google Sheets in one click. Now it lives outside NotebookLM — shareable, sortable, and something your whole team can act on.
Five More Places This Changes Everything
The volunteer example is just one use case. The same approach works anywhere you’re drowning in documents:
Medical records. Upload your test results, doctor’s notes, prescription history, and anything else you’ve accumulated. Before your next appointment, ask for a table with columns for date, finding, what it means, and questions to ask your doctor. You walk in prepared instead of overwhelmed.
Contract comparisons. Upload two or three contract offers you’re evaluating. Ask for a table comparing key terms: duration, payment schedule, termination clauses, deliverables, red flags. What would take a lawyer an hour to summarize takes NotebookLM seconds.
Competitive research. Upload your competitors’ websites, product pages, and any reviews you’ve found. Ask for a table showing features, pricing, target audience, and what each product does better or worse than yours. Instant landscape view.
Big decisions. Buying a car, picking a laptop, choosing a health insurance plan — upload everything you’ve collected and ask for a comparison table built around what actually matters to you. Let the AI do the reading.
Insurance Policy Comparisons. Whether you're a broker helping a client or just shopping for your own coverage, upload every policy under consideration and ask for a table comparing the features that matter most — premiums, deductibles, coverage limits, exclusions, and anything else you want side by side.
One Quick Tip: Getting Emails Into NotebookLM
The fastest way to add an email as a source in NotebookLM is to print it as a PDF. When you go to print, select PDF as the printer instead of a physical printer. Save the file, then add it as a source in your notebook. Simple, and it preserves all the formatting.
Whatever you’re researching, organizing, or deciding — NotebookLM’s data table is the fastest way to turn a pile of documents into something you can actually act on.
Please share this post and visit edmaxwellai.com